Let us a write a program to Automate the case to toggle the Wi-Fi
Test Case:
1. From the Home page, click on App Tray icon
2. Launch settings from the App Tray by clicking on the Settings icon
3. Turn ON/OFF wi-fi from settings page
Test Procedure:
Step 1: Click on App Tray Icon
See the previous post to know how to click on the App Tray
Step 2: Launch Settings
From the App Tray, we have to click on the "Settings" icon. App Tray is a scrollable container, we can scroll it horizontally
First screen:
 Second screen:
From the above screen it is clear that the settings icon is present in the second screen of the App tray. To click on the settings icon, we have to navigate to the second screen and then click on the settings icon.
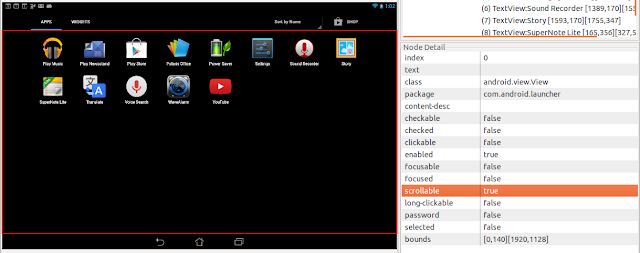
Using "UiScrollable" class, we can simulate vertical or horizontal scrolling across a display. This technique is helpful when a UI element is positioned off-screen and you need to scroll to bring it into view.
Create a scrollable object for App view using the class "android.view.view" shown in the UiAutomatorViewer. You can also use the property "scrollable=true"
The following code explains how to create a scrollable object
After the scrollable object is created, we have to specify the swipe direction. Default is the vertical scrolling. Since our App view only supports the horizontal swipe, set the direction as horizontal
Now, in the App tray we have to look for the "Settings" application. From the following screenshot, we can get it's class name as 'android.widget.TextView' and contains the text "Settings". Using these properties, we can create a UiObject for Settings app.

Since the settings app is inside the App tray, we have to create a child object for App tray.
In the above code we have used the method "getChildByText(childPattern, text, allowScrollSearch)", which accepts three arguments
a. Child pattern -- select pattern for the UI element
b. text -- Text of the element
c. AllowScrollSearch -- accepts either true/false. If value is set to true, then UiAutomator will search for the element in all the screens by scrolling the view. When it is set to false, then UiAutomator will only search in the current screen. Since the Settings app is in the second screen, we have to set "allowScrollSearch" to true.
Here is the code
Test Case:
1. From the Home page, click on App Tray icon
2. Launch settings from the App Tray by clicking on the Settings icon
3. Turn ON/OFF wi-fi from settings page
Test Procedure:
Step 1: Click on App Tray Icon
See the previous post to know how to click on the App Tray
Step 2: Launch Settings
From the App Tray, we have to click on the "Settings" icon. App Tray is a scrollable container, we can scroll it horizontally
First screen:


From the above screen it is clear that the settings icon is present in the second screen of the App tray. To click on the settings icon, we have to navigate to the second screen and then click on the settings icon.
Using "UiScrollable" class, we can simulate vertical or horizontal scrolling across a display. This technique is helpful when a UI element is positioned off-screen and you need to scroll to bring it into view.
Create a scrollable object for App view using the class "android.view.view" shown in the UiAutomatorViewer. You can also use the property "scrollable=true"
The following code explains how to create a scrollable object
UiScrollable appViews = new UiScrollable(new UiSelector().className("android.view.View")
        .scrollable(true));
After the scrollable object is created, we have to specify the swipe direction. Default is the vertical scrolling. Since our App view only supports the horizontal swipe, set the direction as horizontal
appViews.setAsHorizontalList();
Now, in the App tray we have to look for the "Settings" application. From the following screenshot, we can get it's class name as 'android.widget.TextView' and contains the text "Settings". Using these properties, we can create a UiObject for Settings app.
Since the settings app is inside the App tray, we have to create a child object for App tray.
   UiObject settingsApp = appView.getChildByText(new UiSelector()
        .className(android.widget.TextView.class.getName()),
        "Settings",true);
In the above code we have used the method "getChildByText(childPattern, text, allowScrollSearch)", which accepts three arguments
a. Child pattern -- select pattern for the UI element
b. text -- Text of the element
c. AllowScrollSearch -- accepts either true/false. If value is set to true, then UiAutomator will search for the element in all the screens by scrolling the view. When it is set to false, then UiAutomator will only search in the current screen. Since the Settings app is in the second screen, we have to set "allowScrollSearch" to true.
Here is the code
    //Launch Settings from App Tray
    public void testLaunchSettings() throws UiObjectNotFoundException{


        UiObject AppsTab = new UiObject(new UiSelector().className("android.widget.TextView").description("Apps"));

        if(AppsTab.exists())
            AppsTab.click();

        UiScrollable appView = new UiScrollable(new UiSelector().className("android.view.View")
        .scrollable(true));

     // Set the swiping mode to horizontal (the default is vertical)
     appView.setAsHorizontalList();

     // Search for the settings application in all the screens
     UiObject settingsApp = appView.getChildByText(new UiSelector()
        .className(android.widget.TextView.class.getName()),
        "Settings",true);


    if(settingsApp.exists())

     settingsApp.clickAndWaitForNewWindow();

    }